
With our latest Graphlytic 3.2 release, we introduced a powerful feature: Query Templates. This significant improvement aims to bring our vision to life and make Graphlytic the best place for all graph analysts, including those with a non-technical background.
What precisely do we mean by that? We aim to let Graphlytic users work efficiently with predefined Query Templates by easily selecting the requested template from the Global Repository and adding a variable range of parameters (depending on the complexity of the query). Use-case-specific Query Templates, from the simplest to the most complicated ones, can be constructed by the administrators of Graphlytic application (or Graphlytic support on demand) and added to the Global Repository. The user can then simply select the template he or she wishes to apply for his analysis. Basics on how the Query Templates work were described in our previous blog post What's New in Graphlytic 3.2. Below, you will find a step-by-step tutorial on how to start with Query Templates and how to construct them, starting with simple examples and gradually adding parameters to allow the users to set their own query criteria.
In this article, we'll present examples of Query Templates to give you an idea of how they can improve analysts' work and make it much more effective. All examples of Query Templates presented here will be applied to an IT infrastructure data set. You can try them by yourself in our IT Infrastructure Demo.
The answer is:
Analysts using graph visualization often need to:
The easiest way is to explore data sets manually on the 'Visualization page' by searching the data set, adding nodes and edges to the graph visualization, and examining their neighbours. This is the basic analysts' activity. No coding skills are required, and it can be very motivating to search for findings when new data sets are explored. On the other hand, it can be very time-consuming if applied to repetitive tasks.
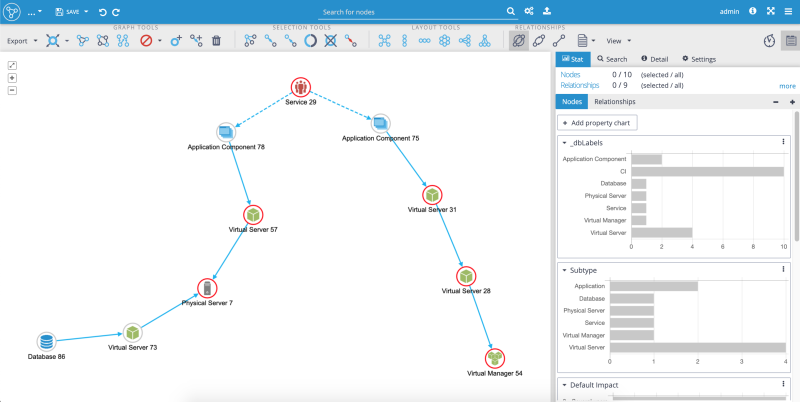
For example, the analyst might want to find out if there is any connection between the two nodes. On the 'Visualization page,' he or she can select the nodes and click on the button "Find the shortest path." The shortest path is selected and displayed with its length (the number of neighbours to get there) and the number of paths with the same length. Every next search requests repeating these steps.
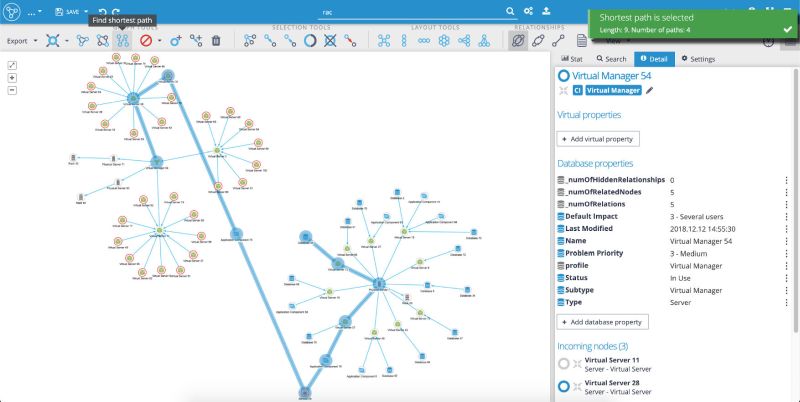
The example of finding the shortest path when exploring the data set in the 'Visualization page'.
The next level in traversing data sets is the work with the 'Search & Manage Data' screen. It is primarily designed to search for graph elements, allowing users to add discovered elements to an opened or new graph visualization. User permission rights set by the administrator define what data the user can access. Search for nodes on this screen is done using Search Queries. Taking into account the various skills of the users, Graphlytic gives the user three options for creating queries:
'Node Filter' Query, placed in the 'Query Builder' panel (on the left, the active tab is set to 'Node Filter'). Queries are constructed using the fulltext search for nodes combined with the query builder. The user can filter the nodes based on labels or property values. The user has to decide which labels or properties will be displayed in the result table. The user hits the 'Run Query' button when the filter with selected values is set. Query results - the nodes found in the underlying graph database - are displayed in a table on the left side of the Search & Manage Data screen. The table contains found nodes as rows, one per node. The columns of the result table are the labels or properties preselected by the user in the previous step. The user can sort them. Finally, the user can select the nodes found by the Node Filter Query with three action options:
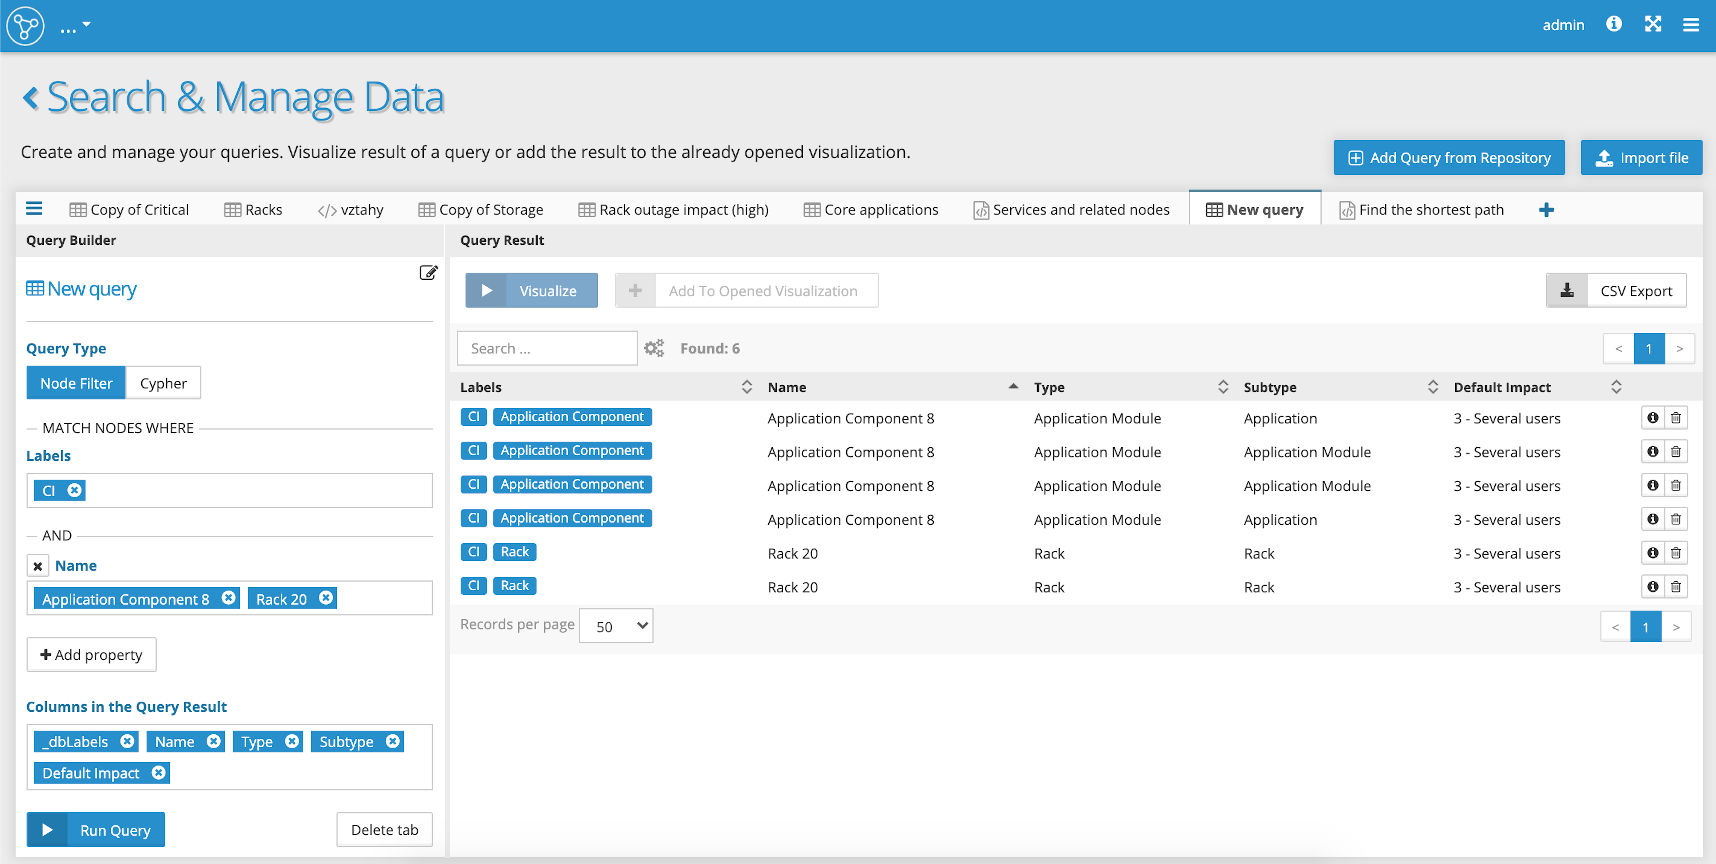
'Node Filter' Query example of query filtering out the nodes with the label 'CI' (CI for 'Configuration Item') and the properties 'Application Component 8' and 'Rack 20'
'Cypher' Query, placed in the 'Query Builder' panel (on the left, the active tab is set to 'Cypher'), is a twin option to the Node Filter Query for the users skilled in Cypher Query Language. Why the twin option? It allows using the same query constructed with the Node Filter Query but the query translated into the Cypher language (As you can see below, in the picture, running the Cypher statement in the 'Query Builder panel' gives us the same results as introduced in point 1. Node Filter Query). Nevertheless, the user can construct any Cypher query by hitting the 'Run Query' button. All consequent options are identical to those described in detail in point 1.
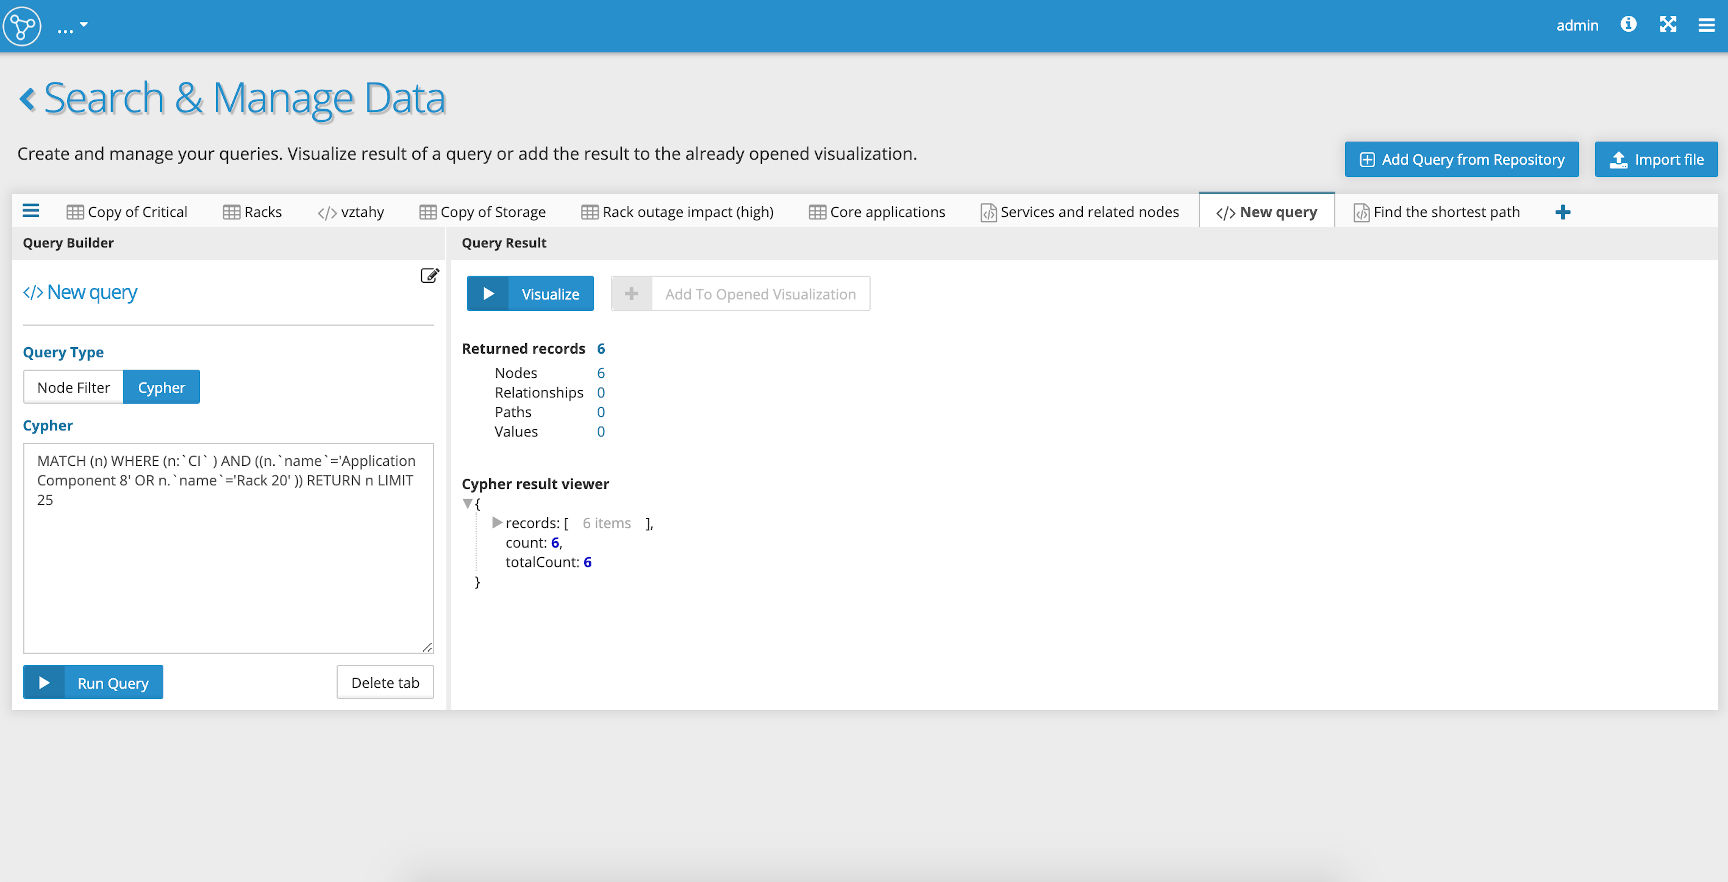
'Cypher Query' example of query filtering out the nodes with the label 'CI' (CI for 'Configuration Item') and the properties 'Application Component 8' and 'Rack 20' - identical query as in point 1. 'Node Filter' Query
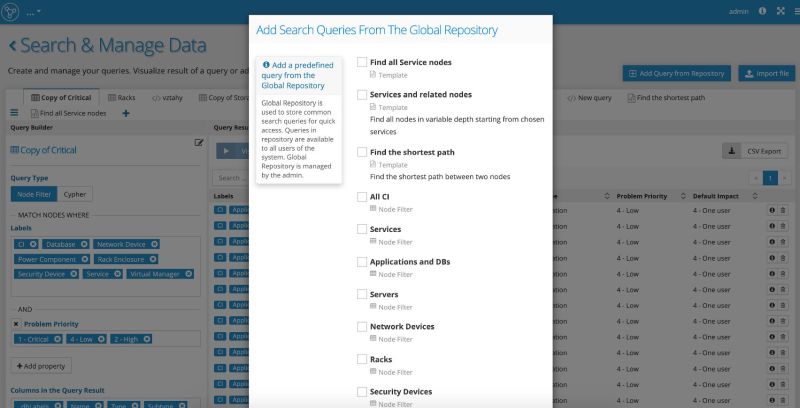
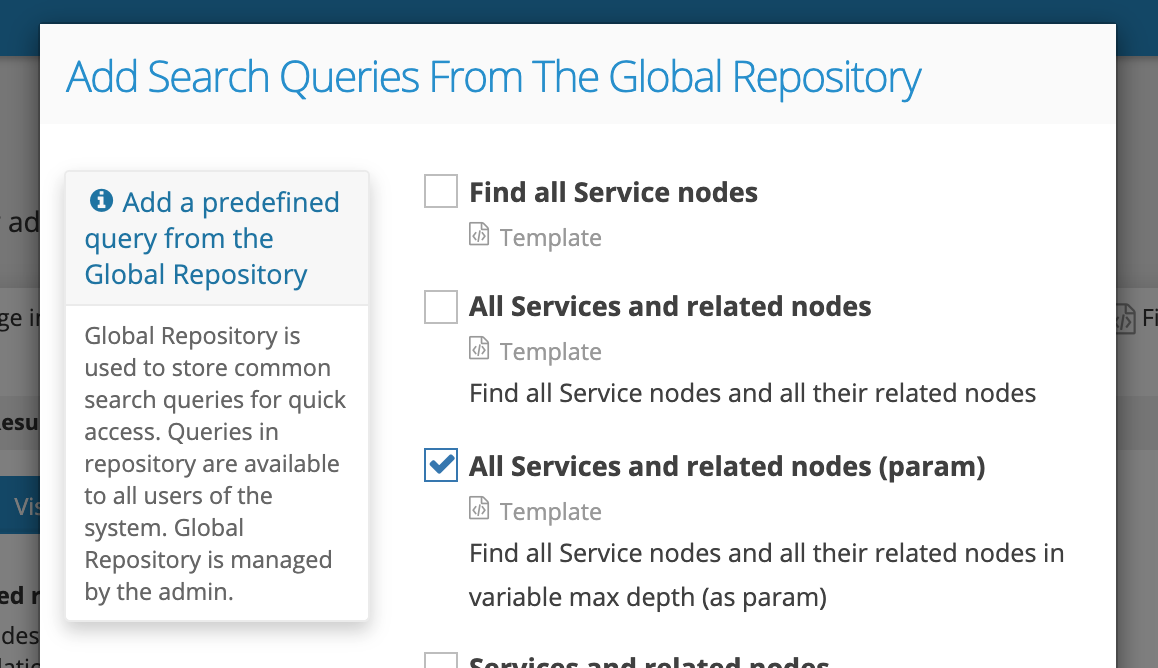
Query Templates are placed in the panel 'Add Search Queries From The Global Repository' (opened by clicking on the 'Add Query from Repository' button on the top right of the 'Search & Manage Data' screen). Query Templates are the perfect solution for users who need to construct and run queries without programming skills.
Managing Query Templates
Admins first! To set up a new Query Template (and consequently any other Query Template), we'll need to go to the 'Application Menu' (top right on the screen) and select the 'Settings' option to get to the 'Settings' page:
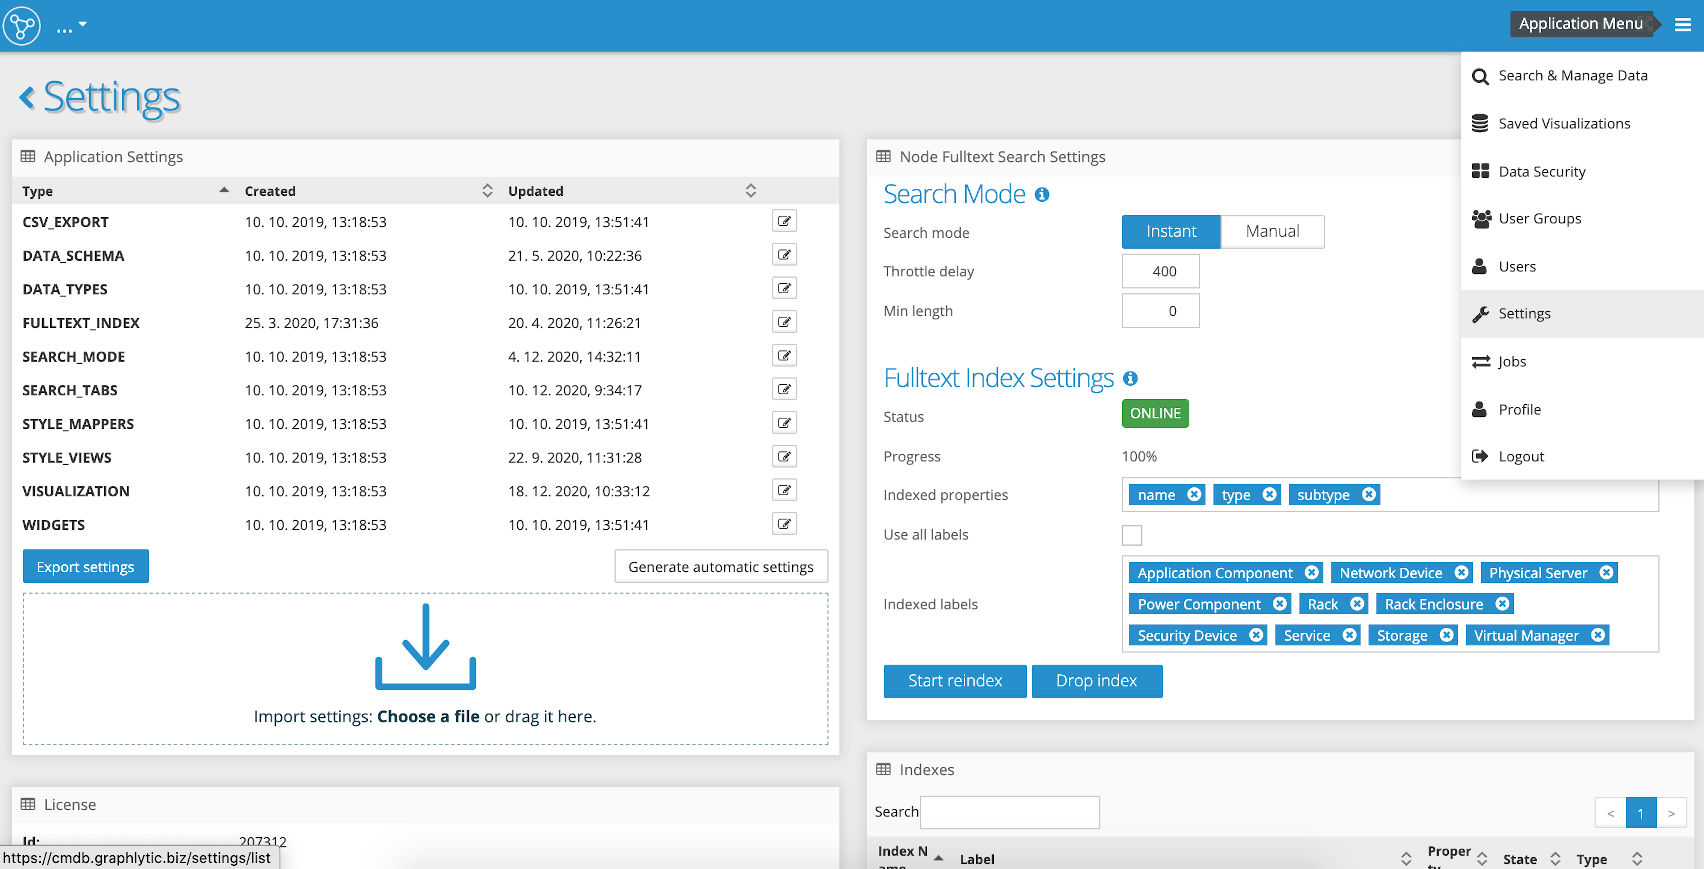
On the left side of the screen, in the 'Application Settings' menu, click on the 'SEARCH_TABS' row. The pane 'Update Setting SEARCH_TABS' will be displayed.
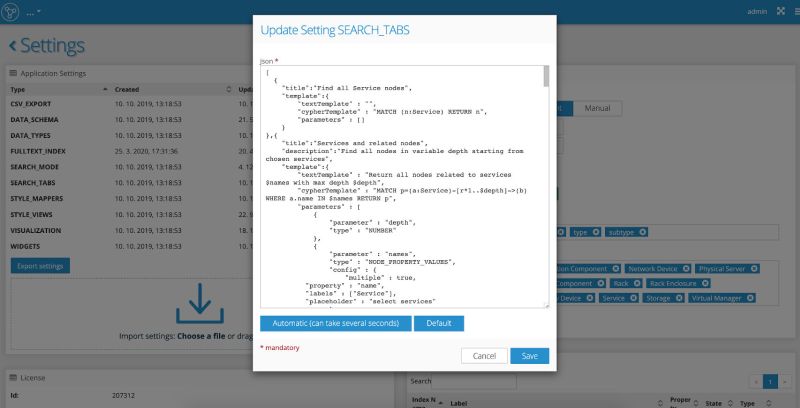
The configuration of the 'SEARCH_TABS' (and all the 'Application Settings' tabs) is also entered in JSON format. When done, hit the 'Save' button. That's all for the admin part.
Note: You'll find examples of Query Templates in the chapters below.
Using Query Templates
Now, the user's turn. As mentioned, the user can find all the Query Templates in the 'Search & Manage Data' screen by clicking the 'Add Query from Repository' button. With one click on the empty checkbox, the user can pick the selected Query Template.
After hitting the button 'Add selected queries', the new tab will be added.

The new tab could contain just the name of the Query Template and the 'Run Query' button (in case of the simplest queries), or it can contain a few rows for adding parameters for the query. Query results - the nodes - are displayed in a table identical to the table described in point 1.
In the following part, we'll introduce examples of how admins or users with Cypher language programming skills (and permissions) can construct a specific Query Template. We'll start with simple Query Templates and add complexity to some of them step-by-step.
We'll act as admins. Let's start with the simplest examples of Query Templates. At this point, we don't intend to allow users to set their own criteria for the search.
Imagine that the user has a data set that changes daily, and he or she needs to find all 'Service' nodes (i.e. nodes with the label 'Service') in the data set. In this case, we'll prepare a simple Query Template. The user can run the query with just one click.
Admin:
A simple Cypher query for returning all nodes with the label 'Service' will sound like this:
MATCH (a:Service) RETURN a
Now, the 'SEARCH_TABS' on the 'Settings' page, written in JSON format, has to be modified to have this JSON string with Cypher query incorporated:
{
    "title":"Find all Service nodes",
    "template":{
        "textTemplate" : "",
        "cypherTemplate" : "MATCH (a:Service) RETURN a",
        "parameters" : []
    }
}
Note: Rules for modifying the JSON statements in 'SEARCH_TABS' are described in detail in the Queries page documentation.
After clicking on the 'Save' button, the Query Template is ready for the user.
User:
The user will go to the 'Search & Manage Data' screen and select the 'Add Query from Repository' button. The user can simply pick the requested Query Template by clicking on the empty checkbox like this:
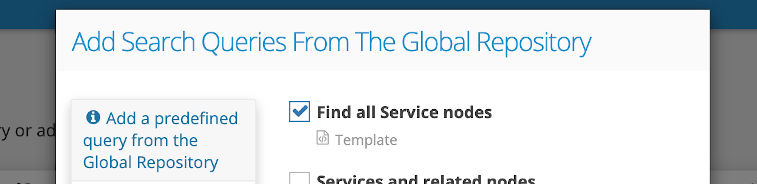
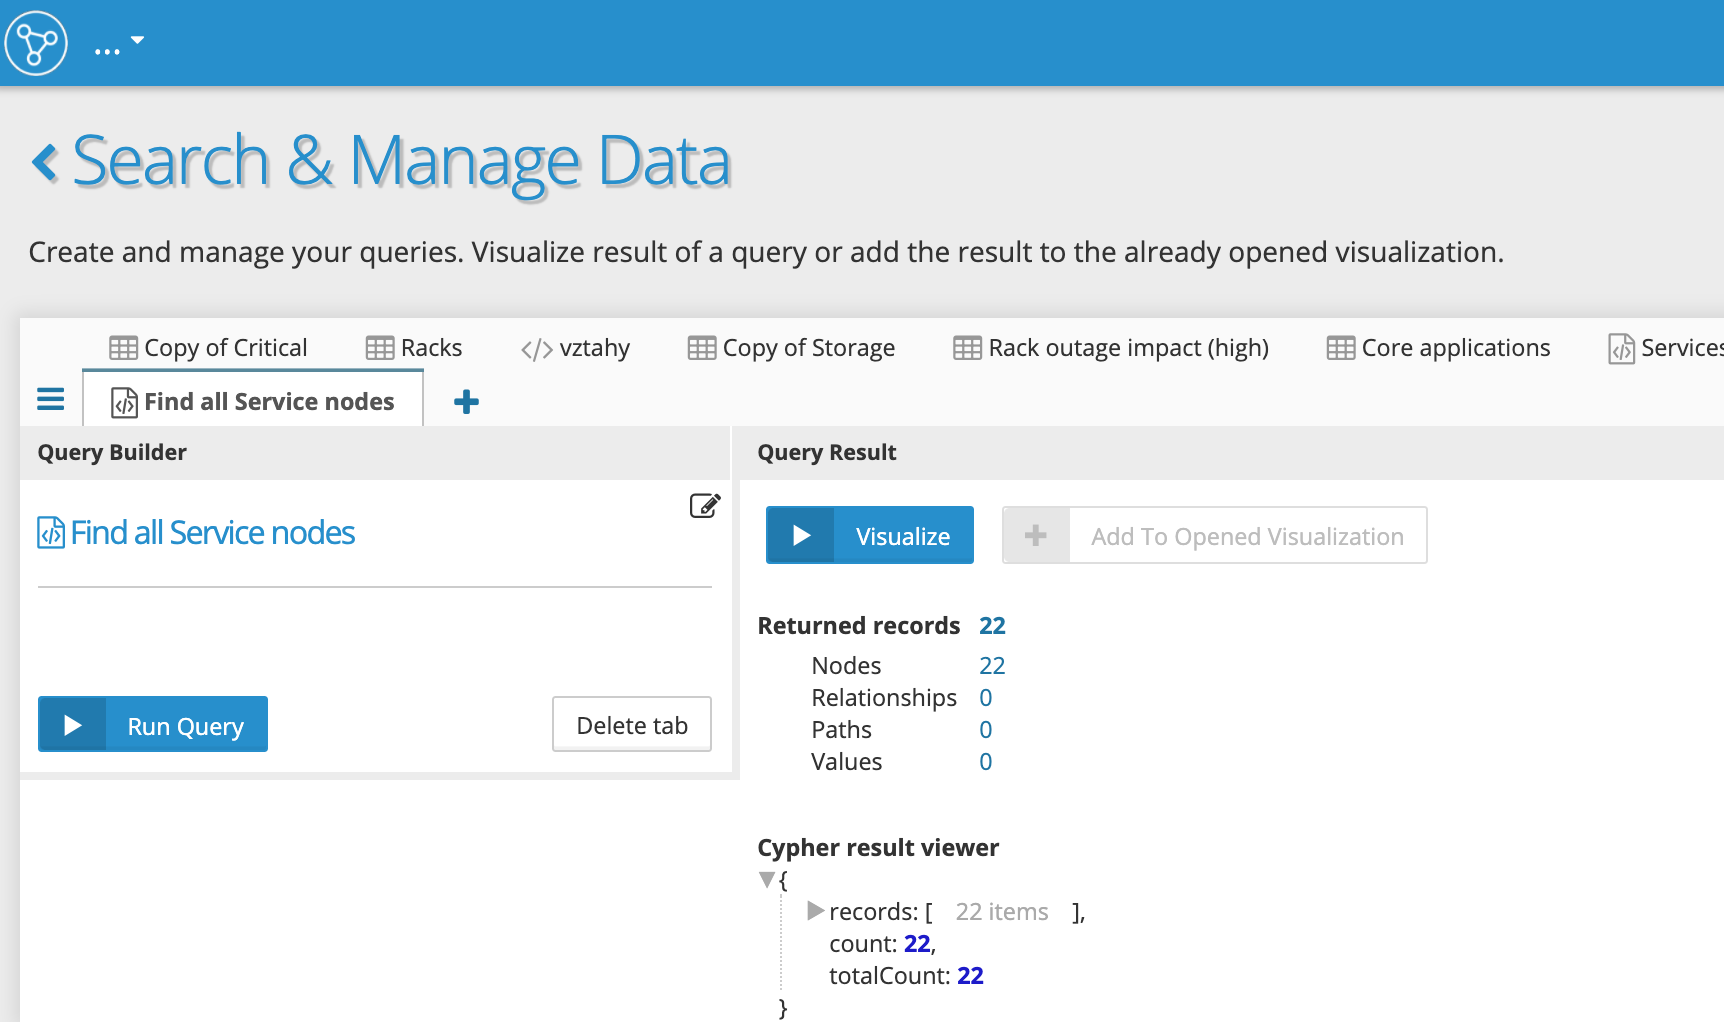
When the user confirms the 'Add selected queries' button, the new tab with the name 'Find all Service nodes' is added. To run the template, the user has to click on the 'Run Query' button:
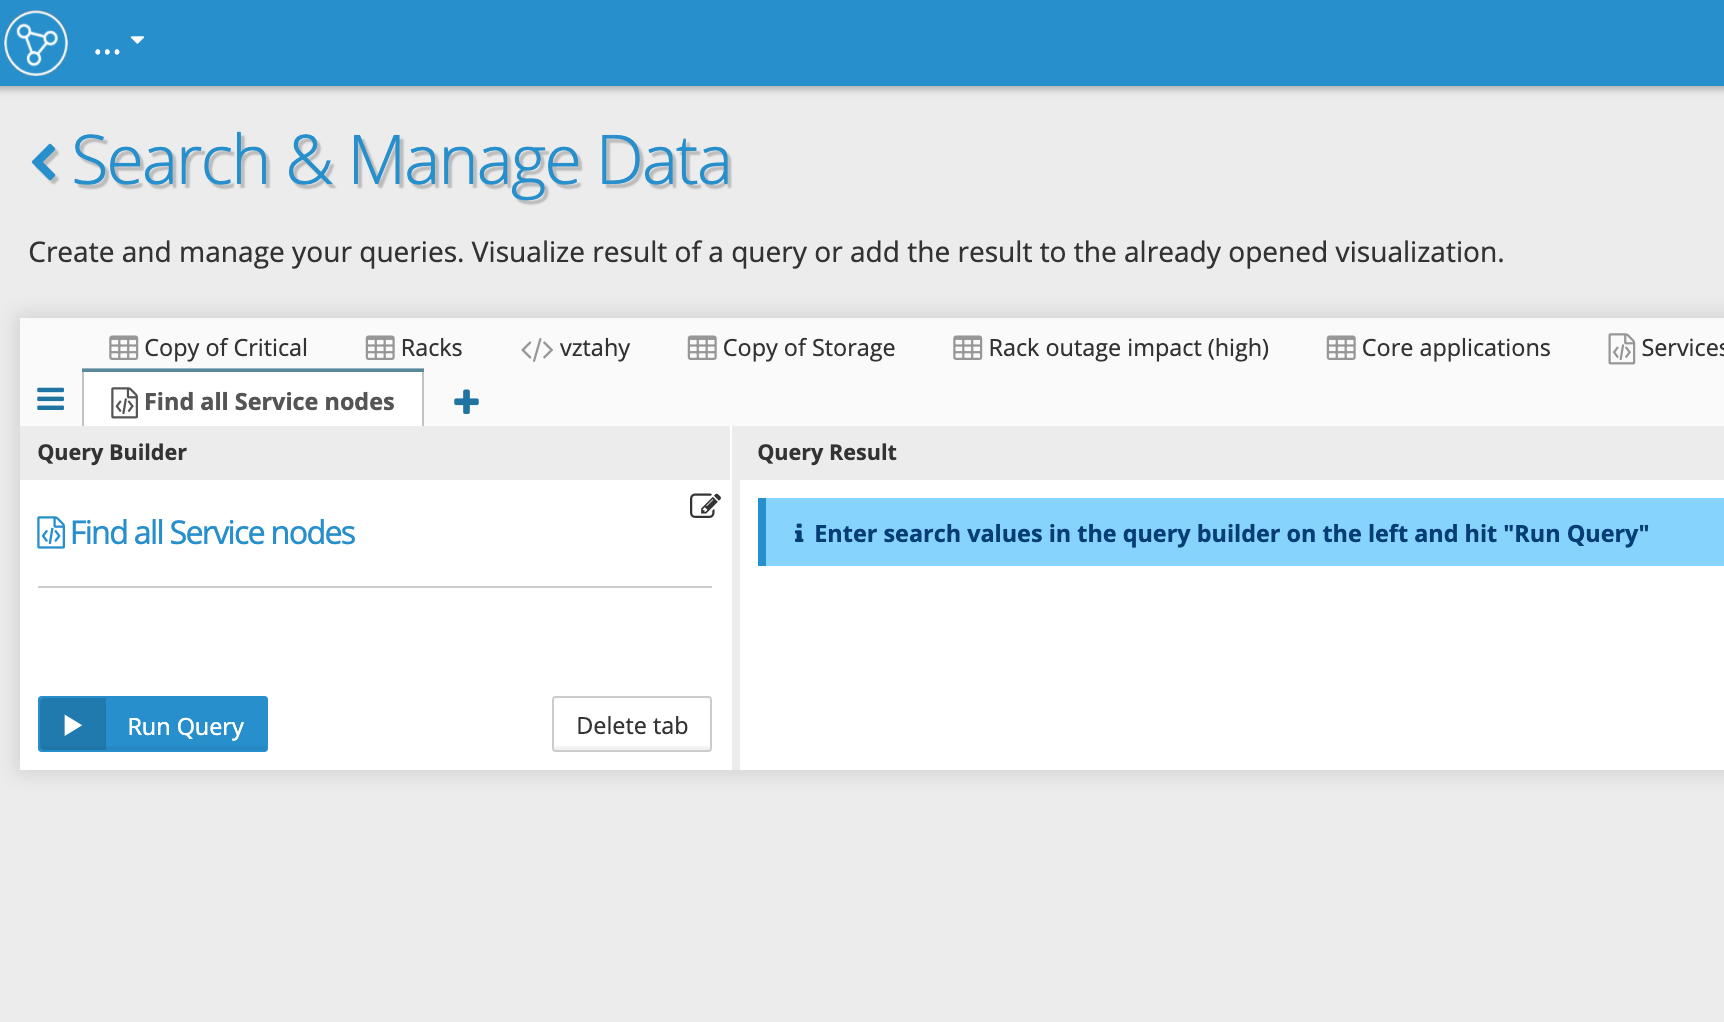
The results are displayed. In this case, with the prepared Query Template, the user found 22 nodes:
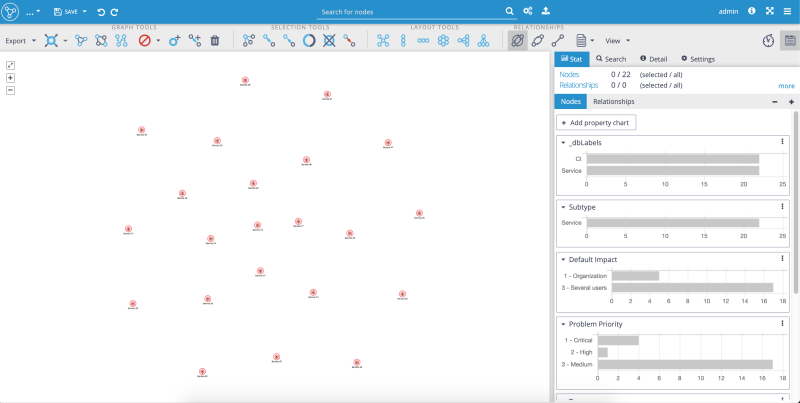
After clicking on the 'Visualize' button, the user gets to the Visualization page, which contains visualized results - all 'Service' nodes - ready for further exploring:
In this example, we'll develop the previous example of Query Template a bit, adding all related nodes to the graph visualization.
Admin:
The Cypher query will be like this now:
MATCH (a:Service)-[r]-(b) RETURN a, r, b
The 'SEARCH_TABS' on the 'Settings' page needs to be modified a bit:
{
    "title":"All Services and related nodes",
    "description":"Find all Service nodes and all their related nodes",
    "template":{
        "textTemplate" : "",
        "cypherTemplate" : "MATCH (a:Service)-[r]-(b) RETURN a, r, b",
        "parameters" : []
    }
}
User:
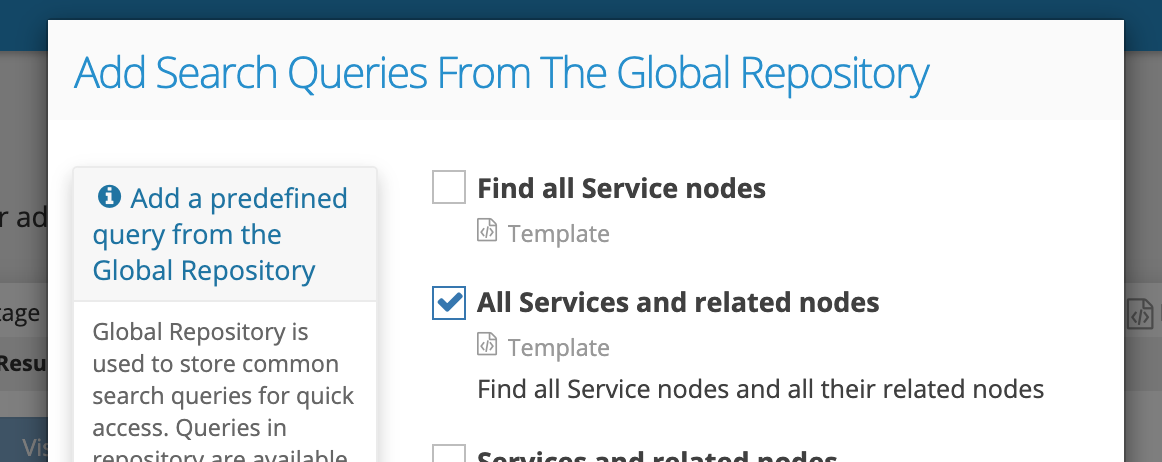
The user will again select the 'Add Query from Repository' button on the 'Search & Manage Data' screen and select the Query Template:
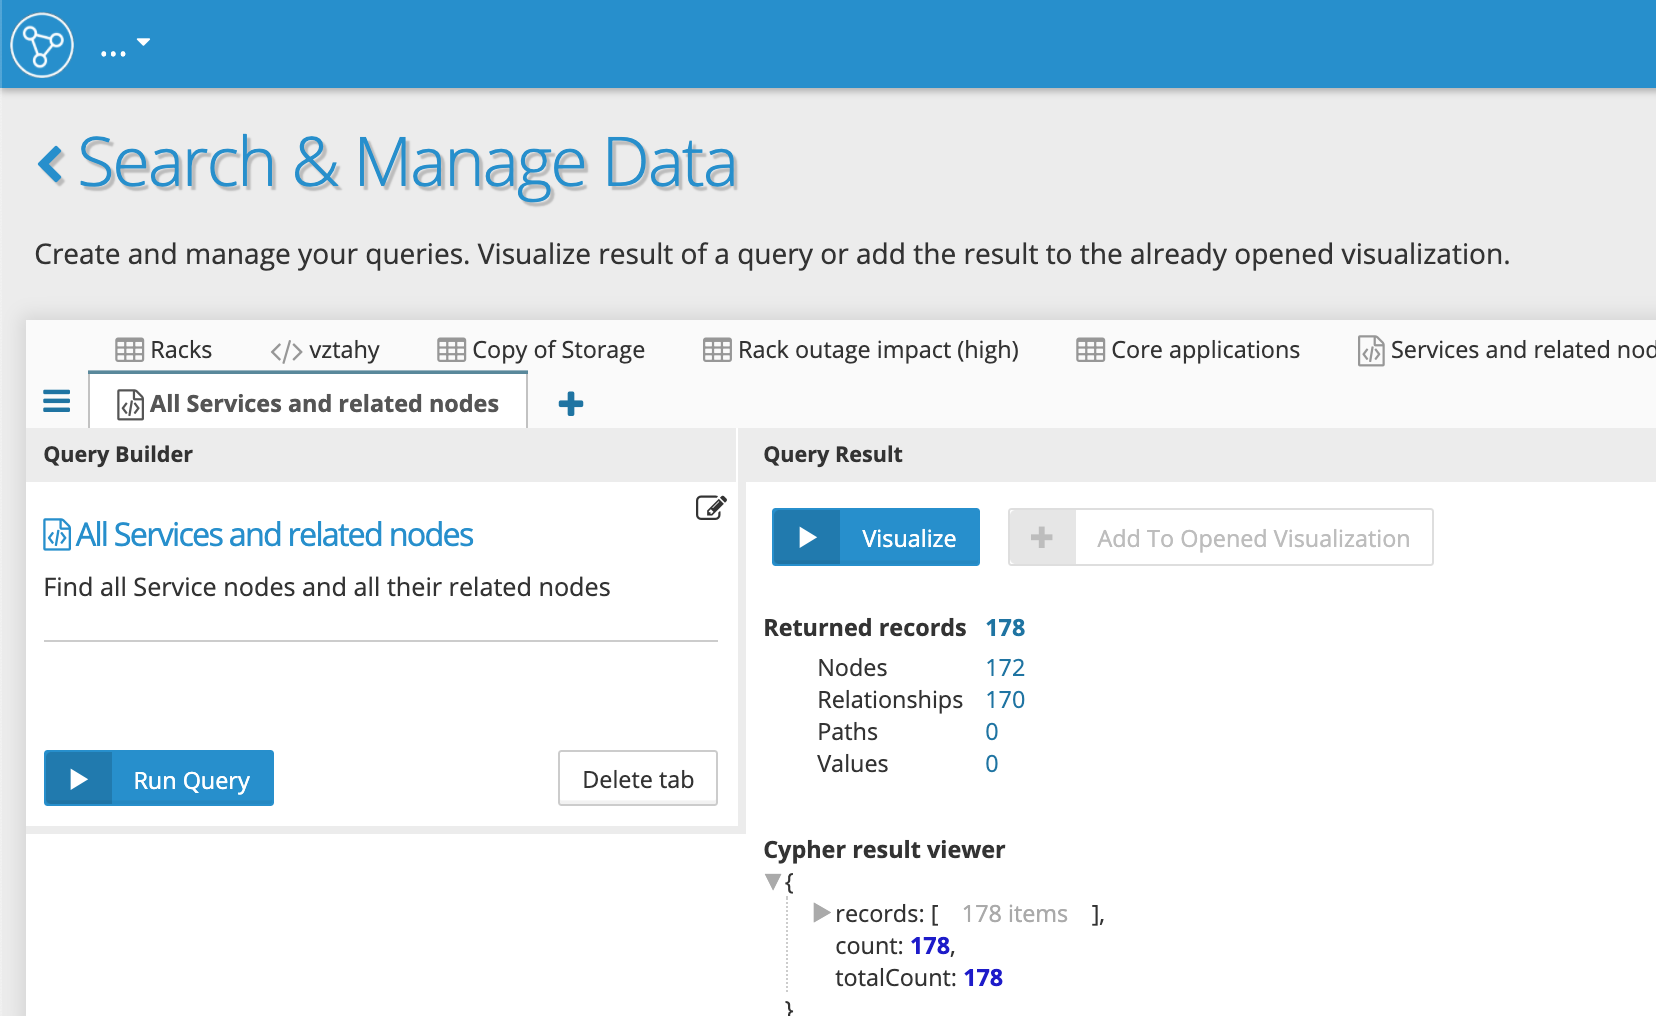
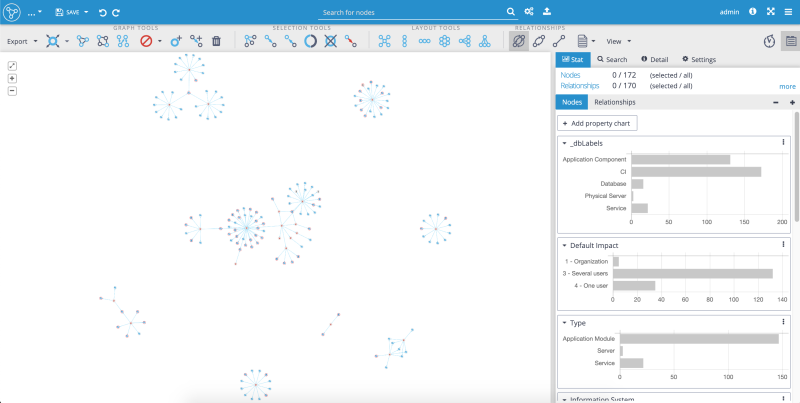
After clicking on the 'Run Query' button, the results of the Query Template are displayed. As you can see, the query returned 172 elements now (of which 22 nodes of 'Service' nodes are the same, as in the previous example):
When the user clicks on the 'Visualize' button, the displayed graph visualization gets much more complex - showing all relevant nodes and relationships:
This is a further upgrade of the Query Template from Example #2, adding a parameter to the Query Template.
Now, we'll step a bit further with the previous Query Template. We'll add a parameter that'll give the user the option to set the maximal depth of relationships related to 'Service' nodes.
Admin:
The Cypher query gets bigger now:
MATCH p=(a:Service)-[r*1..$depth]->(b) RETURN p
This is the updated 'SEARCH_TABS':
{
    "title":"All Services and related nodes (param)",
    "description":"Find all Service nodes and all their related nodes in variable max depth (as param)",
    "template":{
        "textTemplate" : "Return all Service nodes and related nodes with max depth $depth",
        "cypherTemplate" : "MATCH p=(a:Service)-[r*1..$depth]->(b) RETURN p",
        "parameters" : [
            {
                "parameter" : "depth",
                "type" : "NUMBER"
            }
        ]
    }
}
User:
The user will select the requested Query Template:
The user can now define the maximal dept for related nodes to the 'Service' nodes without limitation. Let's say we want to find all related nodes to the depth of 3. As you can see, there is a blank space where the user sets the depth number (we already entered the number 3). When the user clicks on the button 'Run Query', the Query Results will bring 238 nodes and 275 relationships:

The graph visualization is now of much higher complexity:

This is a further upgrade of the Query Template from Example #3 with two parameters in the Query Template.
This example allows the user to decide which 'Service' nodes will be displayed (not all) and set the maximal dept for related nodes.
Details on how to set up this Query Template are described in detail in this post: What's New in Graphlytic 3.2 Enjoy!
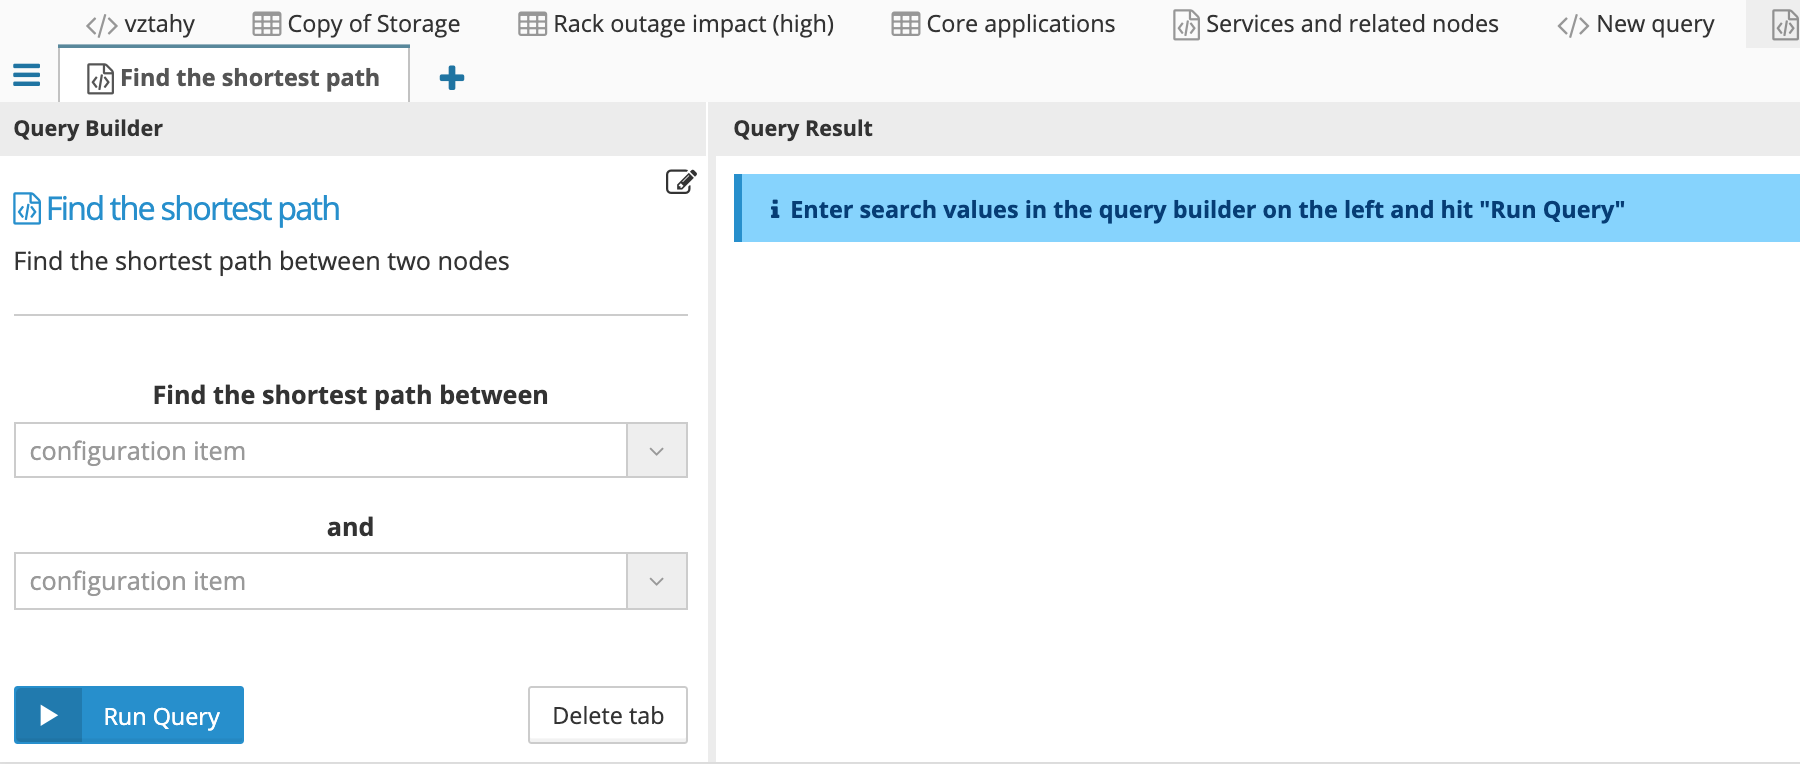
The Template Query for finding the shortest path also contains two parameters. The user can use any two nodes from the data set in the query.
Admin:
This is the Cypher query:
MATCH p=shortestPath((a:CI)-[*]-(b:CI)) WHERE a.name='$CI1' AND b.name='$CI2' RETURN p
The admin will add to the 'SEARCH_TABS' the following JSON:
{
    "title":"Find the shortest path",
    "description":"Find the shortest path between two nodes",
    "template":{
        "textTemplate" : "Find the shortest path between $CI1 and $CI2",
        "cypherTemplate" : "MATCH p=shortestPath((a:CI)-[*]-(b:CI)) WHERE a.name='$CI1' AND b.name='$CI2' RETURN p",
        "parameters" : [
            {
                "parameter" : "CI1",
                "type" : "NODE_PROPERTY_VALUES",
                "config" : {
                    "multiple" : false,
                    "property" : "name",
                    "labels" : ["CI"],
                    "placeholder" : "configuration item"}
            },
            {
                "parameter" : "CI2",
                "type" : "NODE_PROPERTY_VALUES",
                "config" : {
                    "multiple" : false,
                    "property" : "name",
                    "labels" : ["CI"],
                    "placeholder" : "configuration item"
                }
            }
        ]
    }
}
User:
'Find the shortest path' Query Template will be selected by the user:

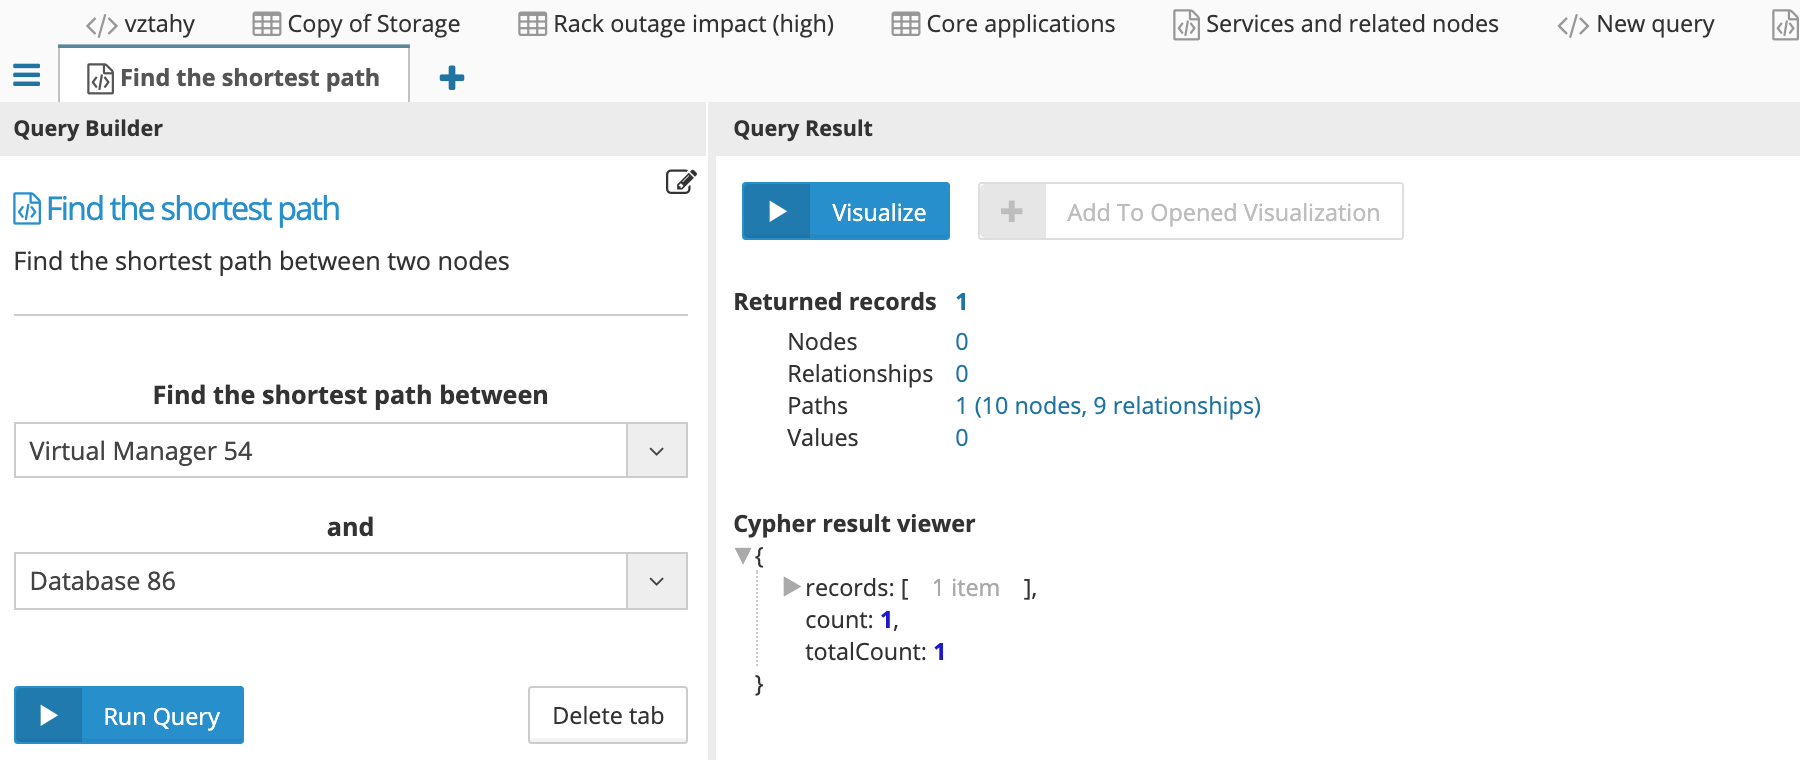
As we can see, the user has the free choice for choosing two of any configuration items (nodes) from the data set:
Now, we can return to the beginning of this article, where we introduce the exploring options. We were looking for the shortest path between 'Virtual Manager 54' and 'Database 86'. We can enter the same endpoints to our new Query Template to find if there are more options or if there are more nodes with the same properties. The result is that there is the same path (no other paths or components with the same properties in the data set):
Feel free to try out all the examples of Query Templates in our online IT Infrastructure Demo. Please leave us your comments with your ideas and experience with the query templates below.
Demtec, s.r.o.
Karpatské námestie 10A
831 06 Bratislava
Slovakia
ID: 47807890
VAT ID: SK2024104434
EMAIL: info@graphlytic.com
TEL: +421 944 289 809