Required Permission: Settings management (Read more about permissions in User Groups)
Table of Contents
Graph connection represents a graph database to which Graphlytic can be connected and used for reading and writing graph data.
Usually, multiple graph connections are created and used in Projects or ETL jobs.
The Graph Connections panel consists of a list of currently defined graph connections on the left and the details of the currently selected graph connection on the right. Every type of graph database requires a slightly different configuration of the connection and also offers different behavior regarding security, clustering, and indexing. Please refer to the appropriate chapter below to see the specifics of the various graph databases.
1. Supported Graph Databases
1.1. Neo4j
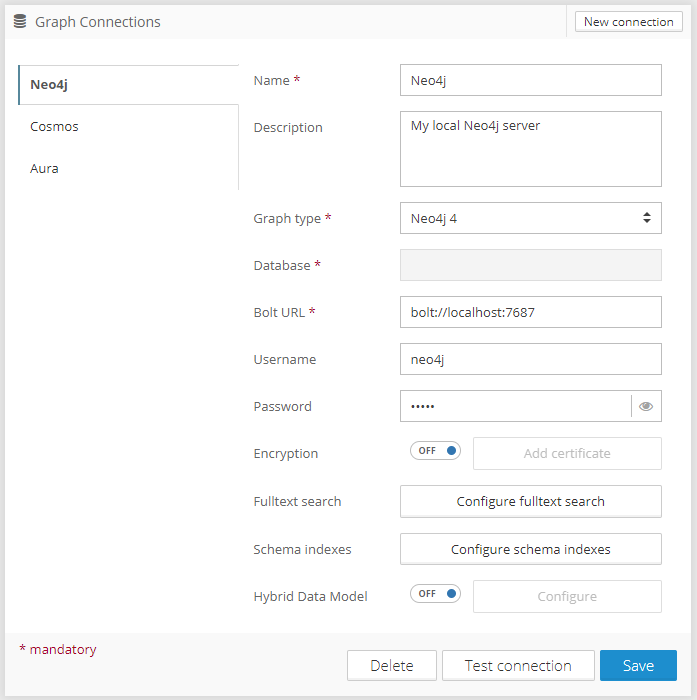
To create a new Neo4j connection:
Click the "New connection" button in the top right corner of the Graph Connections panel.
Enter a human-distinguishable name for your new connection.
Change the Graph type to the correct Neo4j version.
Enter a Database name (in the case of "Neo4j Enterprise").
Enter the Bolt URL, Username, and Password.
If you need an encrypted connection, turn the Encryption setting on.
Option "Add Certificate" is available only for encrypted connections (where Encryption = On).
Click Save and test your connection with the “Test connection” button.
It is possible to define (override) the default values of some graph connection properties in the graphlytic.conf file. For more information, refer to Configuration.
Configuration | Default values | Description |
|---|---|---|
Name | Default | Name of the connection (just for convenience). |
Description | Your description or notes regarding the graph connection. | |
Graph Type | NEO4J 5 | Graph Database type. Supported Neo4j versions (Community or Enterprise) are 3.5, 4.x, 5.x. |
Database | neo4j | Graph Database name. This can be used with Neo4j Enterprise to specify the graph (database) to which to connect. If not specified, the default database specified in Neo4j is used. |
Bolt URL | bolt://localhost:7687 | Graph Database Bolt protocol URL |
Username | neo4j | Graph connection username |
Password | admin | Graph connection password |
Encryption | false | Graph connection encryption. If a trusted certificate is used on the Graph Database side, just set this to true. If it's an untrusted certificate, please use the UI to load the certificate into Graphlytic's Keystore. See the "Certificate" button described below. |
“Add certificate” button | If an untrusted certificate is used in your Graph Database, please use this button to load the certificate into Graphlytic's Keystore. | |
Fulltext search | Cypher Search Search Mode:
| Fulltext index configuration for this Graph Database connection. For more information please see the "Fulltext Search Configuration" chapter below. |
Schema indexes | Node Schema indexes configuration for this Graph Database connection. For more information please see the "Schema Indexes Configuration" chapter below. | |
Hybrid Data Model | Hybrid Data Model configuration for this Graph Database connection. For more information please see the "Hybrid Data Model" chapter below. |
1.1.1. Schema Indexes Configuration
Supported only for Neo4j connections.
To create a Schema Index:
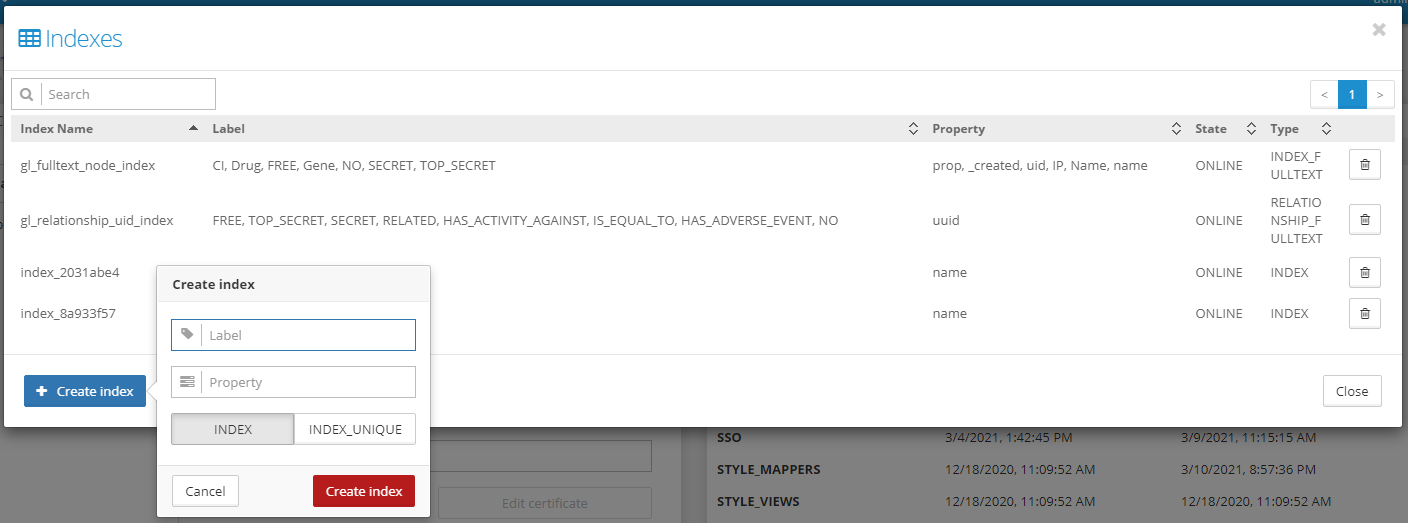
Click on the "Configure schema indexes" button to show the modal window (pictured below).
Click on the "Create index" button.
Fill in the node Label and Property name.
Choose if you want to create a standard index or a unique constraint with it (INDEX_UNIQUE).
Click on the red button "Create index".
To drop a Schema Index:
Click on the "Configure schema indexes" button to show the modal window (pictured below),
and click on the index's bin button in the right column.
1.2. Azure Cosmos DB
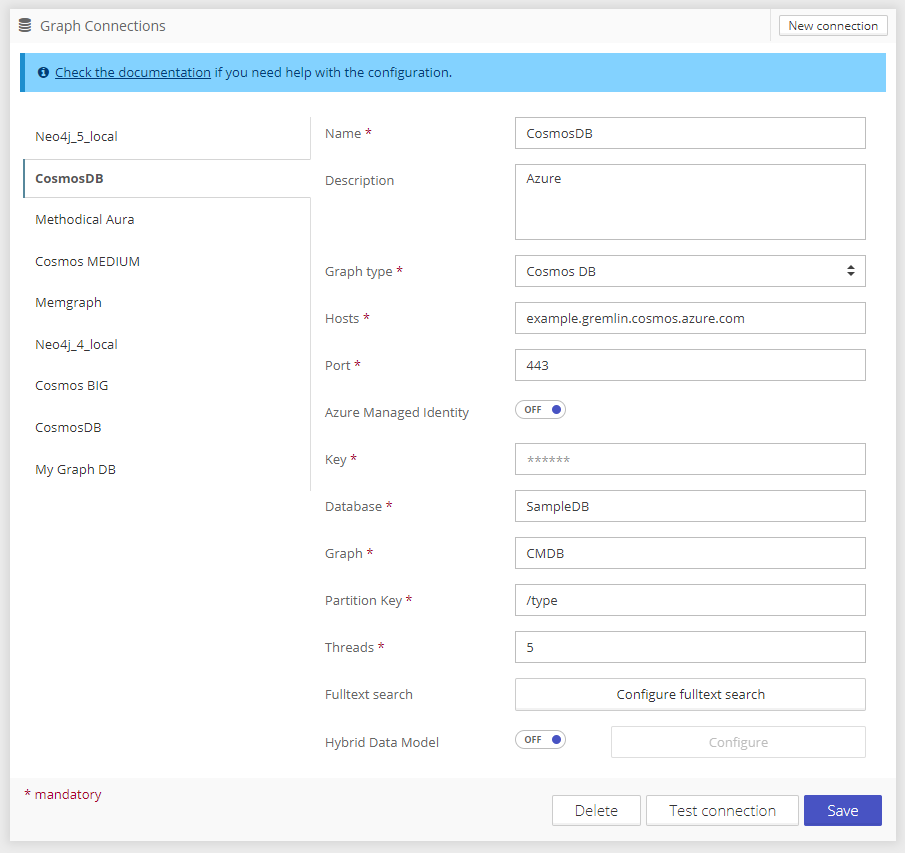
To create a new CosmosDB connection:
Click the "New connection" button in the top right corner of the Graph Connections panel.
Enter a human-distinguishable name for your new connection
Change the Graph type to Cosmos DB.
Enter Hosts, Port, Database, Graph, Key, Partition Key, and Threads.
Click Save and test your connection with the “Test connection” button.
Settings
Configuration | Example values | Description |
|---|---|---|
Name | Default | Name of the connection (just for convenience) |
Description | Your description or notes regarding the graph connection. | |
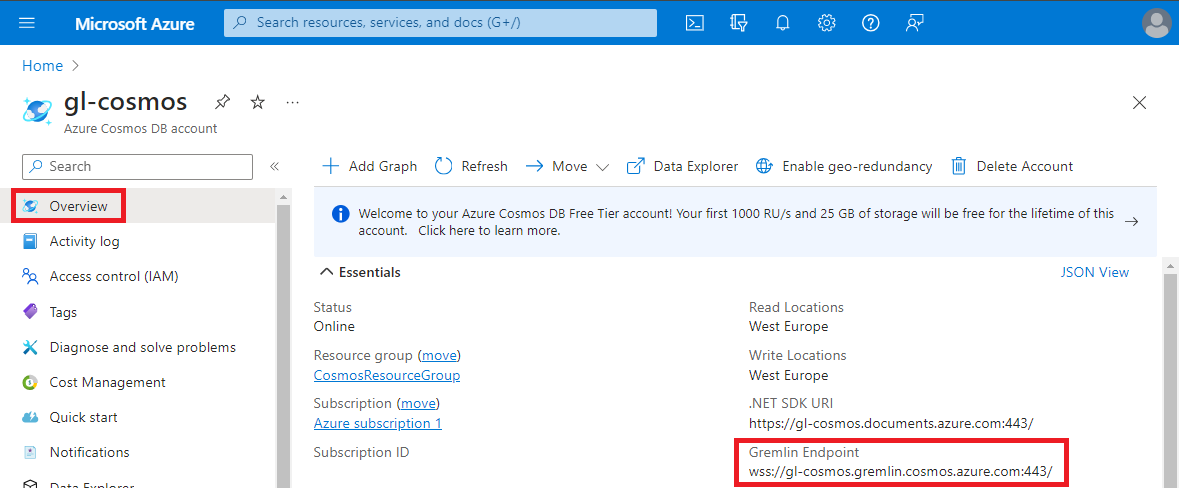
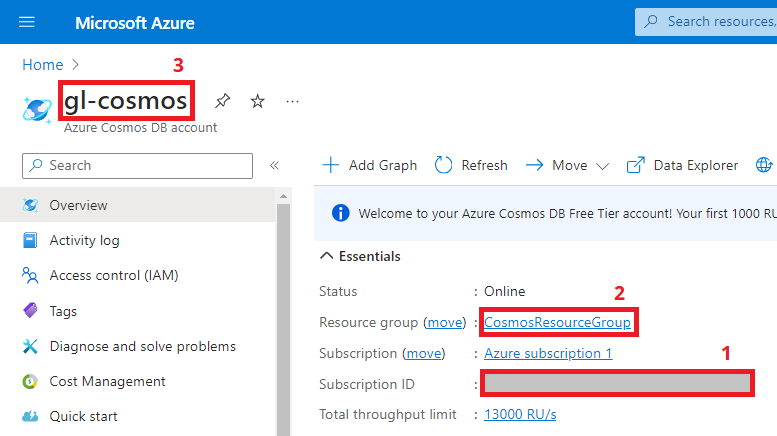
Hosts | someapp.gremlin.cosmos.azure.com | Graph Database hosts value without the protocol. Make sure to provide gremlin host, as CosmosDB provides multiple hosts. The value can be found on the “Overview” page in Azure. See the next chapter for more details. |
Port | 443 | Graph Database port |
Azure Managed Identity | Switching between
| |
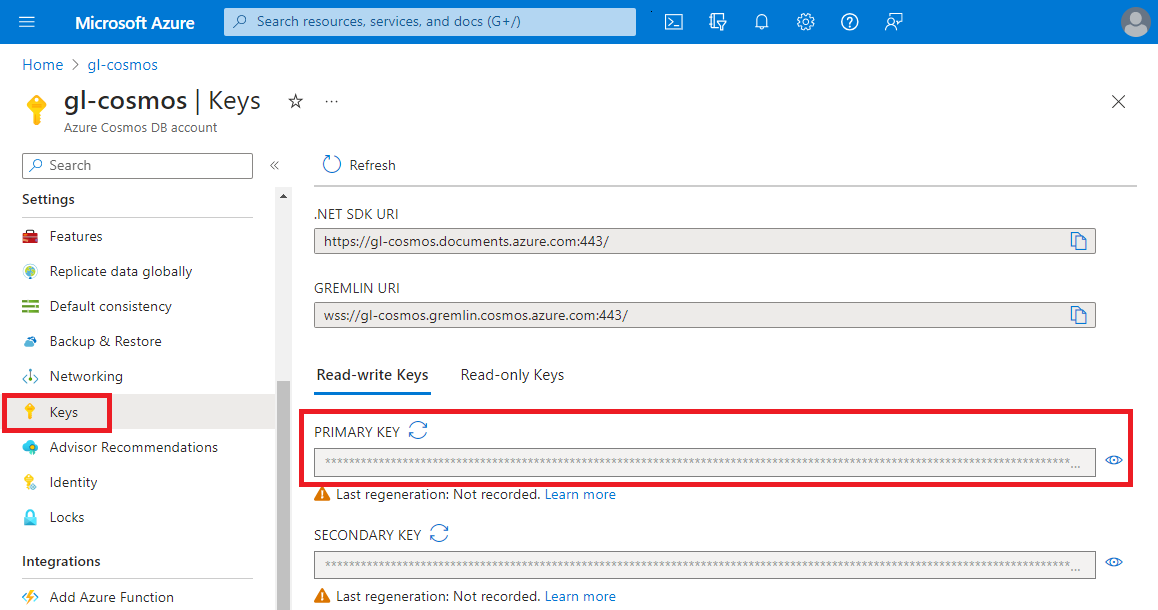
Key | 170c3ea6c3aa7facb8f51c86e114d97c5028b44a38775eae5b3bd07bbea3ff43== | Used when Azure Managed Identity is turned OFF. The primary key for the given database is used for API access. Read-write or Read-only keys can be used based on your use case. Can be found on the “Key” page in Azure Cosmos DB settings. See the next chapter for more details. |
List Key URL | https://management.azure.com/subscriptions/<subscription-ID>/resourceGroups/<resource-group-name>/providers/Microsoft.DocumentDB/databaseAccounts/<Azure-Cosmos-DB-account>/listKeys?api-version=2021-04-15 | Used when Azure Managed Identity is turned ON. The URL to get the connection string from Azure. The URL has a fixed structure (see the example value) wit a few information from your Cosmos DB instance:
See the chapter below for more details. |
Scope | https://management.azure.com/ | Used when Azure Managed Identity is turned ON. Azure Managed Identity Scope. Usually, the value is “https://management.azure.com/”. |
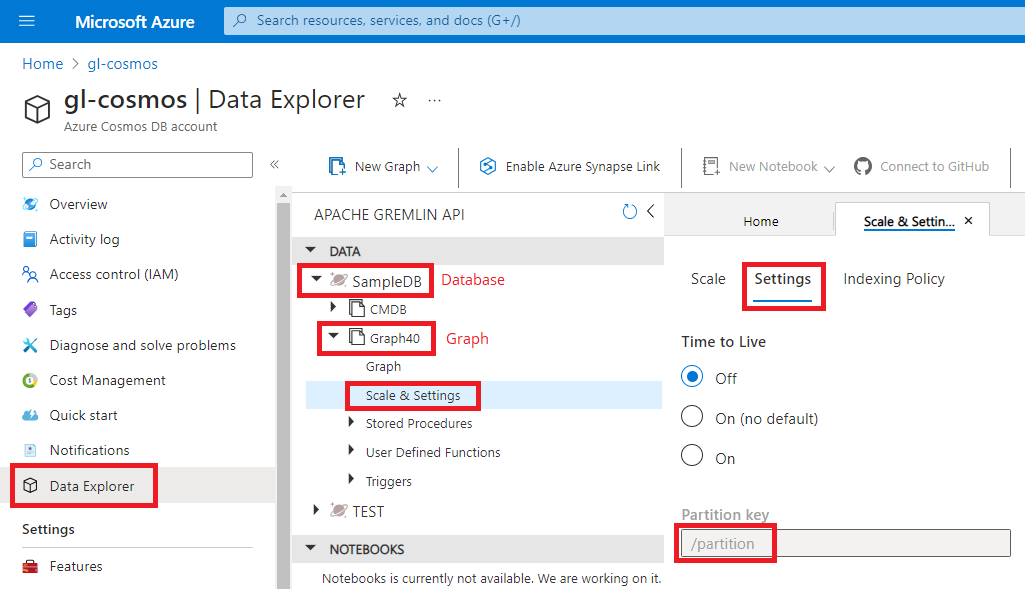
Database | SampleDB | Graph Database |
Graph | SampleGraph | Graph |
Partition Key | /region | Partition key used in this particular Graph. Can be found in Azure in Cosmos Data Explorer under the “Scale & Settings” Settings tab. See the next chapter for more details. Needs to start with “/”. |
Threads | 10 | Number of parallel threads used to run queries in Cosmos DB. Can be a number between 1 and 20. Usually a value between 5 and 10 is optimal. Higher number significantly increases performance of some queries in the application, e.g. loading data into a visualization. This also increases the consumption of the Request Units (RUs) in Cosmos DB and it also increases the RAM needed for Graphlytic.. |
Hybrid Data Model | N / A | Hybrid Data Model configuration for this Graph Database connection. For more information please see the "Hybrid Data Model" chapter below. |
1.2.1. Where to find the settings in Azure
Host
The host value is the same for all databases in your Cosmos and can be found on the “Overview” page in Azure.
Use the value without the port (443) and protocol (wss), e.g. “gl-cosmos.gremlin.cosmos.azure.com”.
Key
The primary key is used to access Cosmos API. Read-write or Read-only keys can be used based on your use case.
List Key URL information
To create a valid List Key URL, this information is needed from the Cosmos DB resource:
Subscription ID
Resource Group Name
Cosmos DB Account Name.
Database, Graph, and Partition Key
These values are specific to a particular graph that you are connecting to. Values can be found in the Data Explorer under the “Scale & Settings” tab.
1.3. Apache TinkerPop Gremlin Server
Apache TinkerPop version 3.4+ is supported.
The only supported serializer option for any gremlin connection is GraphSONMessageSerializerV1d0:
serializer: { className: org.apache.tinkerpop.gremlin.driver.ser.GraphSONMessageSerializerV1d0, config: { serializeResultToString: true }}Make sure this line is present in the Gremlin Server configuration file.
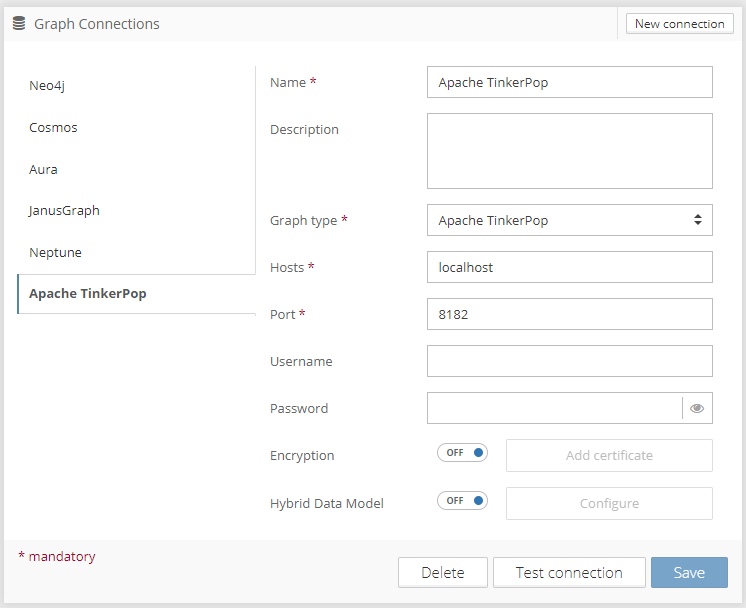
To create a new gremlin connection:
Click the "New connection" button in the top right corner of the Graph Connections panel.
Enter a human-distinguishable name for your new connection.
Change Graph type to Apache TinkerPop.
Enter Hosts and Port.
If you need an encrypted connection, turn the Encryption setting on.
Option "Edit Certificate" is available only for encrypted connections (where Encryption = On).
Click Save and test your connection with the “Test connection” button.
Settings
Configuration | Example values | Description |
|---|---|---|
Name | Default | Name of the connection (just for convenience) |
Description | Your description or notes regarding the graph connection. | |
Hosts | localhost | Graph Database hosts value is without the protocol |
Port | 8182 | Graph Database port |
Username | SecretUser | Graph connection username |
Password | SecretPassword | Graph connection password |
Encryption | false | Graph connection encryption. If a trusted certificate is used on the Graph Database side then just set this to true. If it's an untrusted certificate please use the UI to load the certificate into Graphlytics's Keystore. See the "Certificate" button described below. |
Certificate button | N / A | If an untrusted certificate is used in your Graph Database please use this button to load the certificate into Graphlytics's Keystore. |
Hybrid Data Model | N / A | Hybrid Data Model configuration for this Graph Database connection. For more information please see the "Hybrid Data Model" chapter below. |
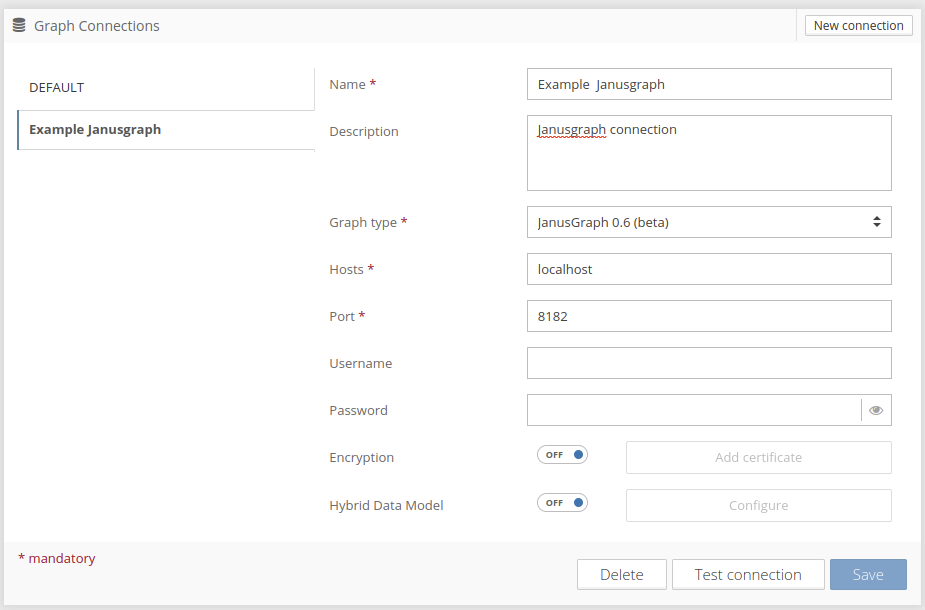
1.4. JanusGraph 0.6
Please use this serializer in your Gremlin Server configuration, otherwise Graphlytic will not function properly:
{ className: org.apache.tinkerpop.gremlin.driver.ser.GraphSONMessageSerializerV1d0, config: { ioRegistries: [org.janusgraph.graphdb.tinkerpop.JanusGraphIoRegistry] } }
To create a new JanusGraph connection:
Click the "New connection" button in the top right corner of the Graph Connections panel.
Enter a human-distinguishable name for your new connection.
Change Graph type to JanusGraph 0.6.
Enter Hosts, Port.
If you need an encrypted connection, turn the Encryption setting on.
Option "Edit Certificate" is available only for encrypted connections (where Encryption = On).
Click Save and test your connection with the “Test connection” button.
Settings
Configuration | Example values | Description |
|---|---|---|
Name | Default | Name of the connection (just for convenience) |
Description | Your description or notes regarding the graph connection. | |
Hosts | localhost | Graph Database hosts value is without the protocol |
Port | 8182 | Graph Database port |
Username | SecretUser | Graph connection username |
Password | SecretPassword | Graph connection password |
Encryption | false | Graph connection encryption. If a trusted certificate is used on the Graph Database side then just set this to true. If it's an untrusted certificate please use the UI to load the certificate into Graphlytics's Keystore. See the "Certificate" button described below. |
Certificate button | N / A | If an untrusted certificate is used in your Graph Database please use this button to load the certificate into Graphlytics's Keystore. |
Hybrid Data Model | N / A | Hybrid Data Model configuration for this Graph Database connection. For more information please see the "Hybrid Data Model" chapter below. |
1.5. AWS Neptune (beta)
Currently, the IAM authentication to the Neptune instance is not supported, ensure that IAM Authentication is turned off on the Neptune instance.
It is required to have either running EC2 instance or ALB (application load balancer), as Neptune instances are not visible from outside the VPC
To use Graphlytic with Neptune, Graphlytic has to be able to communicate with Neptune instance. This can be achieved by having:
an EC2 instance with Graphlytic in the same subnet group as the Neptune Instance,
or using SSH tunnel to such EC2 instance,
or using ALB.
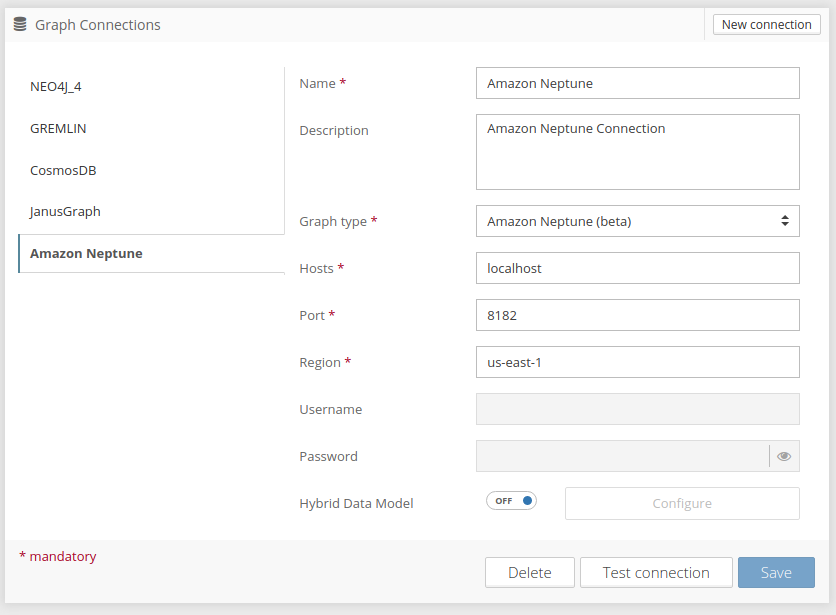
To create a new Neptune connection:
Click the "New connection" button in the top right corner of the Graph Connections panel.
Enter a human-distinguishable name for your new connection.
Change Graph type to Amazon Neptune.
Enter Hosts, Port, and Region.
Click Save and test your connection with the “Test connection” button.
Settings
Configuration | Example values | Description |
|---|---|---|
Name | Default | Name of the connection (just for convenience) |
Description | Your description or notes regarding the graph connection. | |
Hosts | Graph Database hosts value is without the protocol. This should be gremlin host | |
Port | 8182 | Graph Database port |
Region | us-east-1 | AWS region setting |
Username | SecretUser | Username and password authentication is not currently supported. Can be left blank |
Password | SecretPassword | Username and password authentication is not currently supported. Can be left blank |
Hybrid Data Model | N / A | Hybrid Data Model configuration for this Graph Database connection. For more information please see the "Hybrid Data Model" chapter below. |
1.6. Memgraph
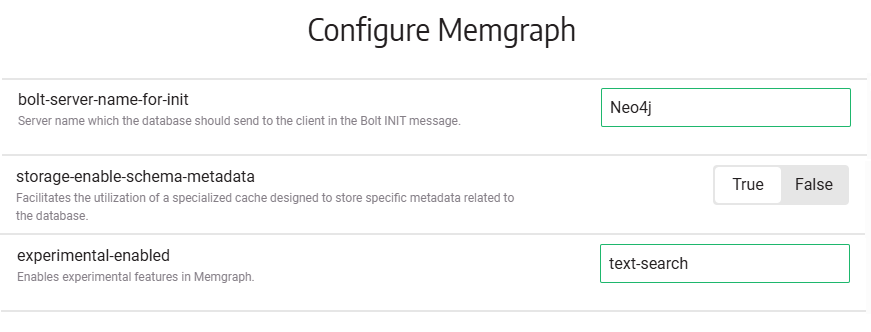
When creating a Memgraph instance, please set these Memgraph configuration options:
“bolt-server-name-for-init” parameter set to “Neo4j”. Otherwise, Graphlytic will not be able to connect to Memgraph due to issues with different Java driver versions.
“storage-enable-schema-metadata” set to “true”. This parameter enables Graphlytic to use current labels and property names in multiple filters.
“experimental-enabled“ set to “text-search” to enable the experimental text indexes. This is necessary when you want to use the Memgraph Search connector in Graphlytic.
Memgraph Cloud
Set the parameters in the configuration options when creating a new project:
Memgraph Docker
Add the parameter to the docker run command:
docker run -it -p 7687:7687 -p 7444:7444 -p 3000:3000 memgraph/memgraph-platform --bolt-server-name-for-init=Neo4jMemgraph connection in Graphlytic
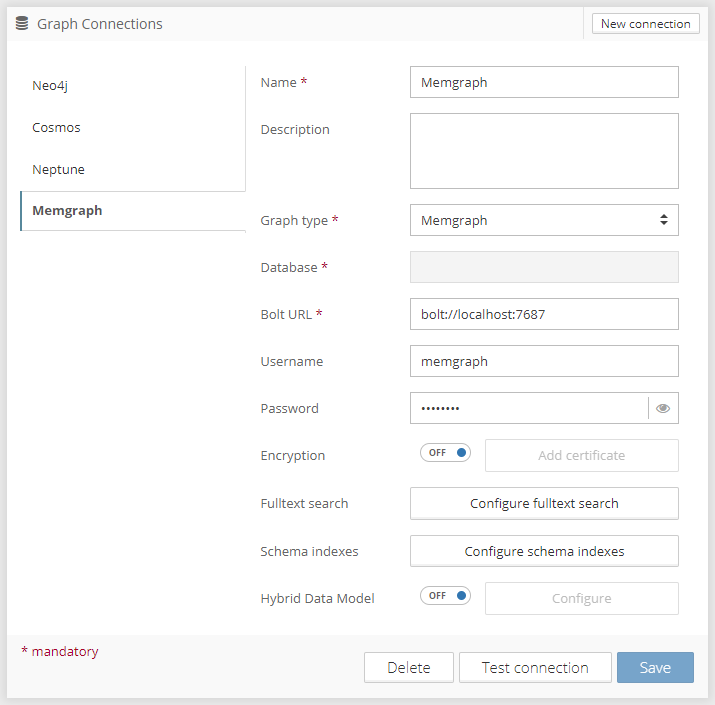
To create a new Memgraph connection:
Click the "New connection" button in the top right corner of the Graph Connections panel.
Enter a human-distinguishable name for your new connection.
Change Graph type to Memgraph.
Enter Bolt URL, Username, and Password.
Click Save and test your connection with the “Test connection” button.
Settings
Configuration | Example values | Description |
|---|---|---|
Name | Default | Name of the connection (just for convenience) |
Description | Your description or notes regarding the graph connection. | |
Bolt URL | bolt://localhost:7687 | Graph Database Bolt protocol URL |
Username | memgraph | Graph connection username |
Password | memgraph | Graph connection password |
Encryption | false | Graph connection encryption. If a trusted certificate is used on the Graph Database side then just set this to true. If it's an untrusted certificate please use the UI to load the certificate into Graphlytics's Keystore. See the "Certificate" button described below. |
Certificate button | If an untrusted certificate is used in your Graph Database please use this button to load the certificate into Graphlytics's Keystore. | |
Fulltext search | Fulltext Index:
Search Mode:
| Fulltext index configuration for this Graph Database connection. For more information please see the "Fulltext Search Configuration" chapter below. |
Schema indexes | Node Schema indexes configuration for this Graph Database connection. For more information please see the "Schema Indexes Configuration" chapter below. | |
Hybrid Data Model | Hybrid Data Model configuration for this Graph Database connection. For more information please see the "Hybrid Data Model" chapter below. |
1.7. Apache AGE
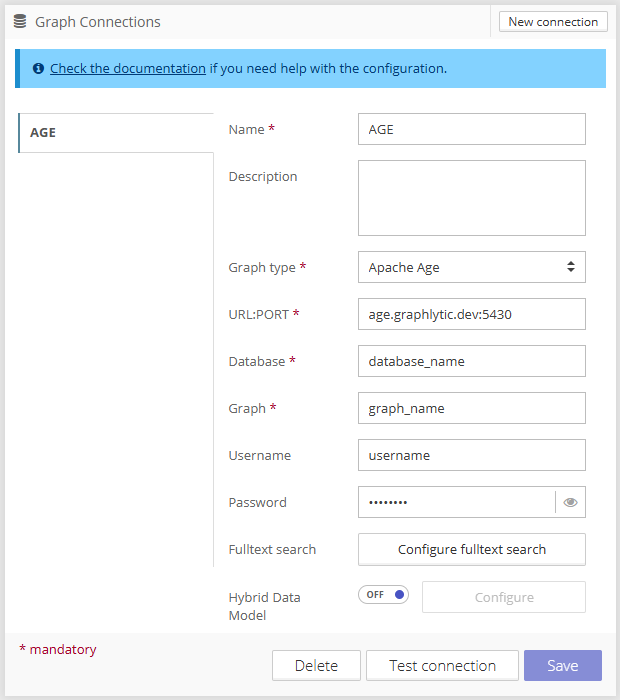
To create a new Apache AGE connection:
Click the "New connection" button in the top right corner of the Graph Connections panel.
Enter a human-distinguishable name for your new connection
Change the Graph type to Apache Age.
Enter URL:PORT, Database, Graph, Username, and Password.
Click Save and test your connection with the “Test connection” button.
Settings
Configuration | Example values | Description |
|---|---|---|
Name | Default | Name of the connection (just for convenience) |
Description | Your description or notes regarding the graph connection. | |
URL:PORT | someapp.domain.com:5430 | Apache AGE URL and port values without the protocol. |
Database | SampleDB | Graph Database name. |
Graph | SampleGraph | Graph name. |
Username | postgre | PostgreSQL username. |
Password | passwd | PostgreSQL user password. |
2. Fulltext Search Configuration
More information about the configuration options can be found on the Search Settings page.
3. Hybrid Data Model
The Hybrid Data Model is Graphlytic's solution for knowledge graphs with near real-time analysis of transactions with time-slicing (the Timeline feature). Its advantages are easy scaling, time slicing without the need for precalculating data, and instant changes in the graph without the need for extensive recalculations every time a new transaction is added.
This approach can be used in many different use cases, e.g.:
financial transactions (money flow)
process mining (document transactions)
communication (phone logs, email logs)
system activity (trace logs, server logs, API logs)
For more information see Hybrid Data Model.
